
Table of Contents
In this guide, we’ll walk through everything you need to know to build a dual-monitor setup using a USB adapter with HDMI. We’ll keep it simple, practical, and focused on what matters most so you can expand your screen space without hassle.
What Is a USB Adapter with HDMI?
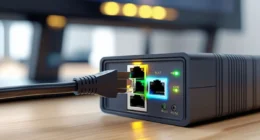
A USB adapter with HDMI is a small device that lets you connect an extra monitor even if your computer doesn’t have enough HDMI ports. It plugs into a USB-A (preferably USB 3.0) or USB-C port and converts its signal into an HDMI output for your additional screen.
Why Use One?
- Gain more screen space for multitasking, ideal for work, study, or creative projects.
- No extra graphics card needed, perfect for laptops or slim desktops that only offer a few ports.
- Portable and easy to carry, making it ideal for on-the-go setups.
- Boost productivity, many users report significant improvements when using multiple screens.
How to Connect a Monitor via USB to HDMI?
1. Check Your USB Port
Make sure you’re using a USB 3.0 port (usually marked with blue or “SS”). It’s much faster and better suited for video. USB-C ports may also work if they support video output (look for DisplayPort or Thunderbolt symbols).
2. Prepare Your Hardware
Gather:
- A USB adapter with HDMI.
- An HDMI cable.
The second monitor, powered on and set to the HDMI input.
3. Install Drivers
Many adapters are plug-and-play, but others require drivers. Either:
- Let your OS install automatically.
- Visit the manufacturer’s site to download the driver.
4. Make the Connections
- Plug the adapter into your computer’s USB port.
- Connect one end of the HDMI cable to the adapter and the other to your monitor.
- Power on the monitor; the computer should detect it automatically.
5. Configure Your Displays
On Windows:
- Right-click desktop, Display Settings, click Detect if needed.
- Choose Extend, desktop, or Duplicate displays, and position them visually.
- Click Apply.
On macOS:
- Open System Settings, Displays, then use Arrangement to position and choose extended or mirrored mode.
Troubleshooting Tips
No signal?
- Recheck USB and HDMI connections.
- Ensure the monitor is on and set to the correct HDMI input.
- Try a different USB port or cable.
Flickering or lag?
- Use a USB 3.0 port.
- Replace any long or low-quality HDMI cables.
- Audio not working
- Set HDMI as the default audio output in your sound settings.
- Need better resolution or refresh rates?
- Verify that both your adapter and computer support higher resolution (1080p or 4K).
Choosing the Right Adapter?
When shopping for a USB adapter with HDMI, consider:
| Feature | Importance |
| USB Type | USB 3.0 or USB-C with video support is the fastest and best for video output. |
| Resolution | Look for support up to 1080p or 4K if you need a sharp, high-res display. |
| Refresh Rate | 60 Hz is standard; higher is needed for smooth video or light gaming. |
| Driver Needs | Prefer plug-and-play if you want simplicity. |
| Extra Ports | Some adapters include USB hubs, Ethernet, or SD readers. |
Pros & Cons Overview
Pros:
- Adds an extra screen without internal upgrades.
- Portable and user-friendly.
- A cost-effective way to boost the workspace.
Cons:
- May have minor latency compared to direct HDMI ports.
- Might not support ultra-high resolutions or fast refresh rates.
Productivity and Use Cases
- Office work: Display references on one screen and your main work on another.
- Students: Research on one screen while writing on the other.
- Creative professionals: Editing with toolbars on one monitor and previews on another.
- Remote workers: Keep video calls on one screen while viewing documents on the other.
Many users say dual monitors make them feel “twice as efficient”.
Wrapping It Up
Setting up a dual-monitor system using a USB adapter with HDMI is easier than it might seem. Simply choose the right adapter, connect your devices, install drivers (if needed), and configure your displays. You’ll enjoy more workspace and efficiency in just a few minutes.
This setup works on Windows and macOS and delivers a clear productivity boost. Keep your cables short and high quality, pick the right adapter based on your needs, and you’ll be enjoying a dual-monitor setup smoothly.
Beyond Two Screens?
Looking for even more screens? Explore USB-to-dual HDMI adapters, MST hubs, or Thunderbolt docks, but keep in mind they may require external power and have higher costs.
Conclusion
Using a USB-to-HDMI adapter is a simple, affordable way to set up a dual-monitor workspace without needing complex hardware changes. It’s perfect for boosting productivity whether you’re working, studying, or creating. Just choose the right adapter, follow the steps, and enjoy the benefits of expanded screen space. For even more monitors, consider advanced adapters or docking stations.